

A garage door rubber seal is an essential component that protects your garage from water, dust, pests, and extreme weather conditions. Over time, seals can wear out, crack, or become loose, reducing their effectiveness. Replacing or installing a new rubber seal is a simple yet highly beneficial home improvement task. In this guide, we will explain how to install a garage door rubber seal step by step in a clear and professional manner. This article is fully optimized to help homeowners understand the process while ensuring long-lasting results.
At Powerlift Garage Doors, we specialize in high-quality garage door services, repairs, and installations. If you ever need professional help, you can explore our garage door repair services for expert assistance.
Why Installing a Garage Door Rubber Seal Is Important
Before starting the installation process, it is important to understand why a rubber seal matters. A properly installed seal prevents rainwater from entering your garage, especially during heavy storms. It also blocks dust, debris, insects, and small animals from entering space. Additionally, a tight seal improves energy efficiency by maintaining indoor temperature and reducing air leaks. This can help lower energy costs and protect items stored inside your garage.
Tools and Materials Needed
To successfully complete the installation, you will need a new garage door rubber seal that matches your door type. Measure your garage door width before purchasing the seal to ensure a proper fit. You will also need a utility knife, measuring tape, screwdriver, rubber mallet, and safety gloves. Having the right tools ready before beginning will make the process smooth and efficient.
Step 1: Inspect the Existing Seal
Start by inspecting your current garage door seal. Look for signs of damage such as cracks, gaps, brittleness, or detachment from the door. If the seal is completely worn out, it should be removed before installing the new one. Carefully examine the bottom track where the seal is attached to determine whether it slides into a channel or is nailed or screwed in place.
Proper inspection ensures that you understand the installation method required for your specific garage door type.
Step 2: Remove the Old Rubber Seal
If an old seal is present, gently remove it. For seals that slide into a track, pull it out slowly from one end. If it is secured with screws or nails, use a screwdriver or appropriate tool to detach it carefully. Avoid damaging the metal track during removal, as this could affect the new seal’s performance.
Once removed, clean the track thoroughly. Use a damp cloth to remove dust, dirt, and debris. A clean surface ensures better adhesion and smoother installation.
Step 3: Measure the Garage Door Width
Accurate measurement is crucial for a proper fit. Use a measuring tape to determine the exact width of your garage door. Compare this measurement with the new rubber seal. If necessary, trim the seal slightly using a utility knife to match the correct size. Always measure twice before cutting to avoid mistakes.
A properly sized seal ensures complete coverage and prevents gaps.
Step 4: Prepare the New Rubber Seal
Before installation, allow the new seal to sit at room temperature for a short time if it was stored in a cold environment. This makes the material more flexible and easier to handle. Straighten the seal to remove any bends or twists.
Careful preparation will help ensure a smooth installation process.
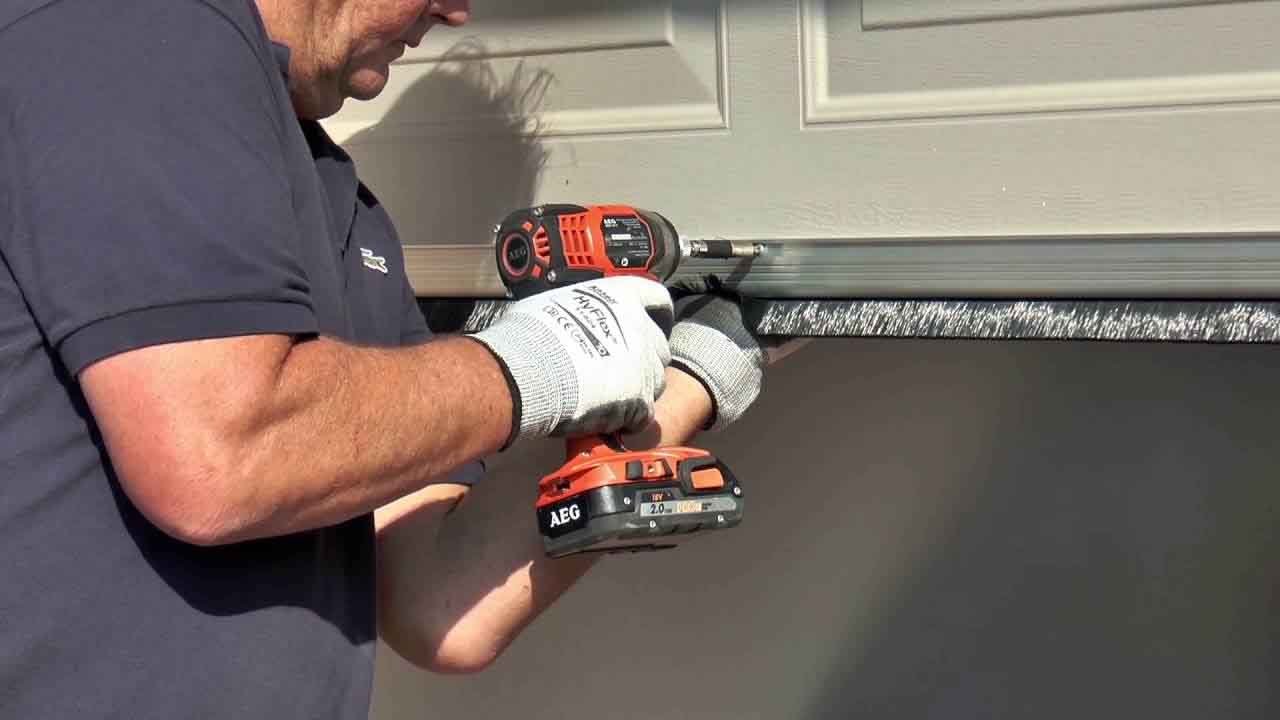
Step 5: Install the New Rubber Seal
Now begin inserting the new rubber seal into the bottom track of the garage door. If it is a sliding type, start from one side and gently push it into the channel. Continue moving along the track until it is fully inserted. Use a rubber mallet if needed to gently tap the seal into place.
Make sure the seal fits evenly across the entire width of the door. Avoid stretching it too tightly, as this may cause future damage.
If the seal requires screws or fasteners, align it properly before securing it. Tighten screws evenly to ensure consistent pressure.
Step 6: Test the Garage Door
After installation, open and close the garage door several times to ensure smooth movement. Check that the seal stays firmly in place and does not shift during operation. Observe the bottom edge of the door to confirm that it makes proper contact with the ground.
Testing ensures that the seal performs effectively and provides full protection.
Step 7: Inspect for Gaps
Stand outside and inspect the bottom of the door while it is closed. Look for any visible gaps between the seal and the floor. If gaps are present, adjust the seal position or recheck the installation alignment. A properly installed seal should create a tight barrier against air and moisture.
Maintenance Tips for Long-Lasting Performance
To extend the life of your garage door rubber seal, clean it regularly with mild soap and water. Avoid using harsh chemicals that may damage the material. Inspect the seal every few months for signs of wear and replace it if necessary. Proper maintenance ensures continuous protection and durability.
If you experience any issues during installation or notice problems with your garage door system, professional assistance is always recommended.
Common Mistakes to Avoid
One common mistake is purchasing the wrong size seal. Always measure carefully before buying. Another mistake is installing the seal on a dirty surface, which can reduce effectiveness. Some homeowners also stretch the seal too tightly, which may cause it to shrink later.
Taking time to follow each step carefully ensures a successful installation.
Benefits of Professional Installation
While installing a garage door rubber seal is a manageable DIY project, professional installation provides additional advantages. Experts ensure precise fitting, proper alignment, and long-term durability. Professional technicians also inspect the entire garage door system for hidden issues.
At Powerlift Garage Doors, we provide reliable services to ensure your garage door functions efficiently and safely.
Final Thoughts
Installing a garage door rubber seal step by step is a practical and cost-effective way to improve your garage’s protection, insulation, and overall performance. By following the correct procedure, using the right tools, and ensuring accurate measurements, you can achieve excellent results. A properly installed seal prevents water damage, keeps pests out, and enhances energy efficiency.
If you need expert guidance or professional garage door services, Powerlift Garage Doors is here to help. Visit our website at https://powerliftgaragedoors.com/ to learn more about our services, explore repair solutions, or read additional helpful guides.
A well-installed garage door rubber seal is a small upgrade that delivers long-term benefits for your home.